By clicking VIEW in the List View you open the Prospect View.
Click the ProspectSafari logo at the top to return to List View.
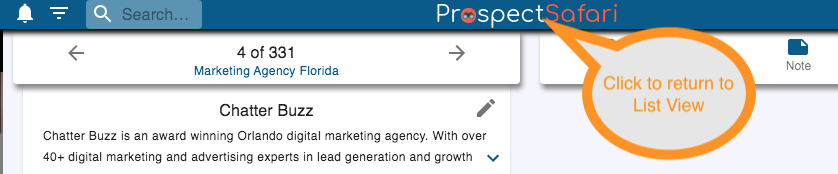
Review your prospect list by navigating forward or back using the arrows at the top.
Double click the record number to enter a specific record, or enter a search term in the box at the top.
You can change the filter by clicking the filter icon at the top.
In the Prospect View you see the data that has been scraped and collected for each prospect and its related contacts. You are also presented with the Decision Bar at the bottom of the screen for fast categorisation and data entry. You can decide what are the key attributes you wish to record for any prospect and enter these as Custom Fields in Settings.
Similarly you can enter up to 3 key “Decision Fields” which are answered A, B, C or Bin. Selecting bin causes you to jump to the next Prospect. Otherwise you will be guided through each Decision and (mandatory) Custom Field in turn for rapid and consistent qualification. Once the last field is entered you jump to the next prospect.
Once any Decision or Custom Field data has been added, the prospect status changes to “New”. If you have set Deals to auto-create on status New, then a Deal is created and the next time you view this prospect the iFrame on the left will default to showing the Intelligent Checklist rather than the website. By clicking on the Contacts tab you automatically switch back to the website view.
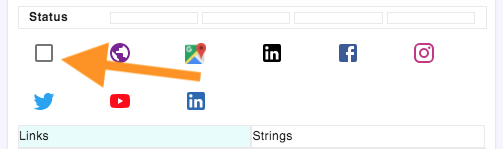
Social icons
Any social media urls scraped from the website will be displayed as icons. These can be edited by clicking the edit icon beside the prospect name.
Clicking a social icon will open the url in a window normally positioned to the left of the ProspectSafari window. The display window will fill the space between the ProspectSafari window and the left of the screen or else overlap the website display if necessary.
Clicking the black Linkedin icon displays a list of employees from a Linkedin search. With the extension installed, the ProspectSafari icon is displayed next to each person – clicking this will add them as a contact to the prospect.
By clicking the box toggle to the left of the social icons, any social icon will have a “sticky” selection; any prospect viewed will open the selected social url automatically.
Contacts
In general, a new contact is created for each email or phone number scraped from the website. In addition, contacts can be added by an upload, manually or by using the extension.
By selecting the Merge icon on the right of each contact you can merge one contact into another. This is useful if you wish to keep otherwise separate email and phone records in a single contact.
The Main Contact is shown at the top of the contact list, and this is the contact that is synchronised with Hubspot (if you have activated this).
With the extension installed you can quickly add a contact from Linkedin by simply clicking on the ProspectSafari icon in Linkedin. You can get a list of employees by clicking on the black Linkedin icon.
Calls, emails
Click on a phone number to open the call log popup. The click to dial icon will be shown next to the phone number if your IPT has this set up. Enter details of the call and always remember to select the call type and save. The call log will be shown in the timeline with the appropriate icon. Lead status will be automatically modified as appropriate.
Click on the email address to open the Create Email popup (provided you have completed the email integration). You can choose a Sequence or Template or simply enter the email text. The email will be tracked and the timeline icon will change when the email is read. All emails to and from and contact (whether sent via ProspectSafari or direct from your email client) will be displayed in the timeline.